I’ve just spent a week in bear country, and at the same time, in an elegant and comfortable house in a prosperous suburb of Vancouver.
Therein lies the challenge – managing peaceful coexistence between the original bearish inhabitants and the encroaching humans. Which humans range from people who leave edible garbage out in flimsy trash cans and have hissy fits, demanding that bears who turn up to investigate this handy food source be removed, to the neighbour who had his fence broken by a bear on its way to the adjacent river multiple times and solved the problem by repairing the fence, building a giant cat flap – hilariously labelled “bear crossing” – into it. The bear courteously uses the bear flap; the fence is still standing.
It’s a serious issue, and needs a lot of education and support to prevent bad bear/human interactions, which too often result in the bear being killed.
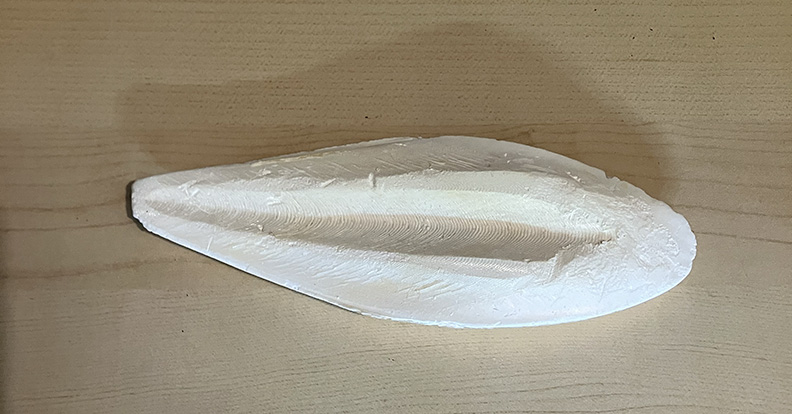
Hence coating the bear.
My hostess (and niece-in-law) Holly Reisner is the Executive Director of the North Shore Black Bear Society. One of the many education programs the NSBBS gives is how to use bear spray. And practising on a target is the most effective way to show people how best to use the spray.
Which brings us to the coated bear. It’s a life size black bear archery target, made of something like foam insulation sheets. Problem is, the solvent in bear spray melts the foam. So Holly and her husband (my nephew Henry) have coated it with a clear urethane.
The art of effective bear spray is straightforward – on the face, where the spray can reach the mucous membranes in the eyes, nose and mouth. Elsewhere, the bear is hairy and pretty much spray-proof. Or it might even attract the bear; they’re very smell motivated, and if it doesn’t sting, it might smell “interesting”.
Even though it seems kinda obvious, I understand the need for training – in the moment, faced by a bear, I suspect that it’s hard to keep cool, remember “mucous membranes”, and aim carefully.
Though practice is supposed to make perfect, this is one area where I’d rather not have the opportunity to refine my technique!
As part of a goldwork embroidery project, I’ve been researching and making cuttlebone pounce powder.
What, and why? Powdered cuttlebone – the internal chalky shell of a cuttlefish, aka a squid – was, and sometimes still is, used to mark out the pattern for embroidery. The technique is called “prick and pounce” – after the pattern is drawn, the lines of the drawing are perforated, or “pricked”, the drawing is fastened to the fabric that’s going to be embroidered, pounce powder is rubbed, or “pounced”, through the holes, and the lines of dots are joined with a fine paint line. If you’d like more detail, Mary Corbet has an excellent description of the process in her blog Needle ‘n Thread.
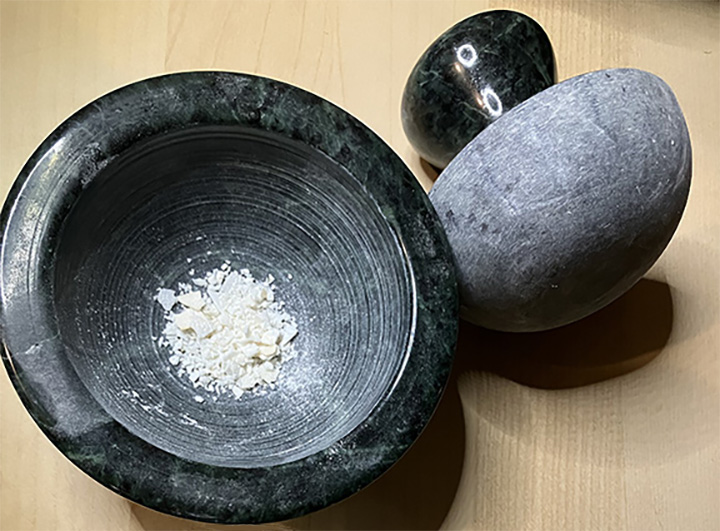
But back to making the cuttlebone powder! I got some cuttlebone from a pet supply; it’s used for budgies as beak maintenance, entertainment, and a calcium supplement.
It weighs practically nothing, and I figured making the powder would be easy – break up the cuttlebone, then pound it up in a mortar & pestle. It wasn’t. My first attempt resisted all my efforts at reducing it to an even texture.
Finally, I put it through a sieve, and saw that what I had was a mixture of a beautifully fine powder and hard, sharp little fragments. I had a good look at the cuttlebone, and realized that what I’d thought was just discolouration due to light exposure and/or oxidization was actually a very, very hard outer shell.
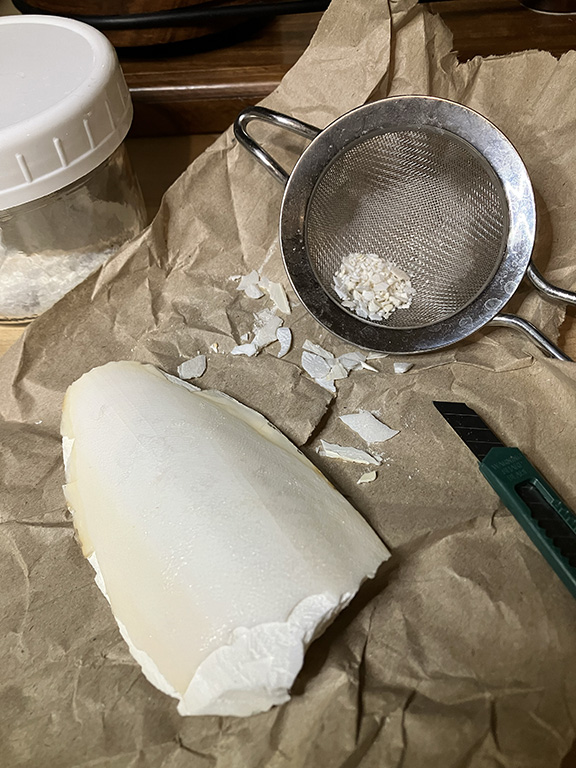
Consulting the interwebs, I discovered it’s called the dorsal shield – and that the physiology of cuttlebone is an exceedingly deep rabbit hole. However, though cuttlebone physiology is fascinating, in practical terms, it means that, with the mortar & pestle, I could only break the dorsal shield into slivers, not reduce it to powder.
So I peeled the dorsal shield off. It was easy to get a knife point under it, but surprisingly hard to break it. Breaking it took so much force that a couple of pieces flew across the room and pinged off the window when they finally succumbed!
Once peeled, the cuttlebone ground up into a lovely, silky, powder.
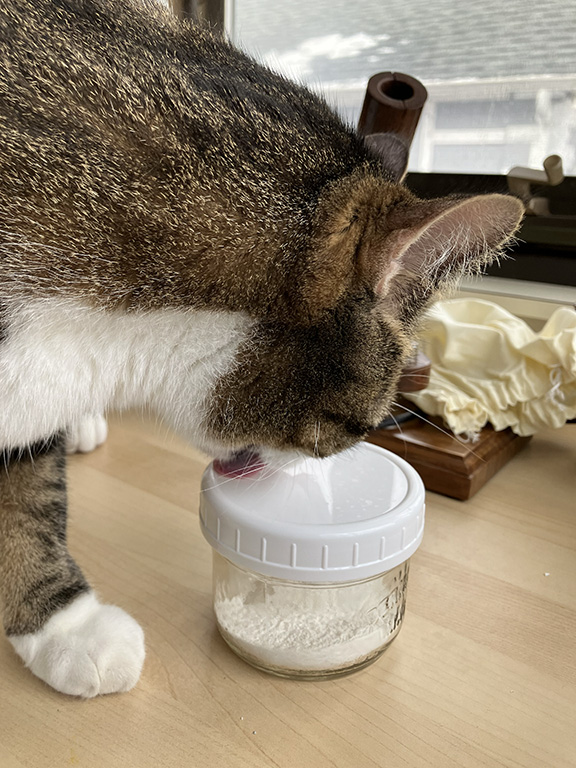
Interestingly, our Syd the mackerel tabby found it fascinating, even in a Mason jar with the lid firmly on. Though I hadn’t noticed that it smelled fishy, with my nose practically in the jar, the powder does have a faint and far away marine tang.
Regarding research into the history of powdered cuttlebone for marking embroidery, it’s proving to be surprisingly obscure, at least on the internet. Since the project I’m working on is an SCA[1] baronial coronet based on the goldworked British guild coronets, I’m looking for 16th century or earlier sources.
So far, though I’ve found many mentions of pouncing with cuttlebone powder, they’ve all been along the lines of “it was used”, with no mention of when, by whom, and where. And to add to the fun, when I search on “cuttlebone” and “prick and pounce”, Google keeps offering mentions that da Vinci and Cellini used the method with powdered charcoal, and yields nothing on pouncing with cuttlebone besides that it’s “traditional”. Googling with just “cuttlebone” gives casting, parchment preparation, abrasives, and budgies, but no real history of needlework marking. Sigh.
I’ve sent out several enquires to people who might know; if any info surfaces, I’ll add it.
[1] The SCA – Society for Creative Anachronism – an international organization dedicated to researching, re-creating and enjoying pre-17th century arts and skills.
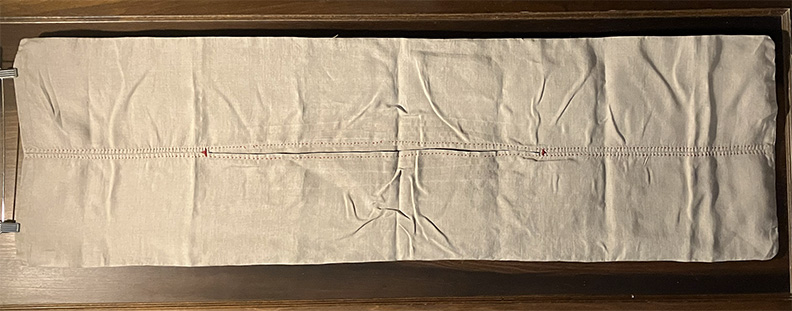
I’ve had quite a few questions about medieval market bags, so here’s a short description:
Market bags can vary in length & width; their main feature is that they’re two pockets, one at each end, usually worn slung over the shoulder to balance the weight, though I’ve found that, with some small loads, wearing it around my neck like a yoke works too.
The one in the pic is one yard of 54” linen folded sides to middle, sewn part way up the middle from each end – 13” from one end and 18” from the other to make a deeper bag. Then it’s sewn across the short ends; there, I used a felled seam to have a clean finish on both inside & outside the bottom of the bags. Having threads fraying loose inside the bag is messy and unpleasant!
One very important detail is to reinforce the ends of the seams at the opening, or it will tear out very quickly – guess how I know! I used arrowhead tacks. Aside from the tacks, the red stitching in the pic is partly decoration, and partly to keep the seam allowances flat.
The bag is amazingly useful, and sturdy – the one in the pic is close to ten years old, and has been stuffed to near-bursting in all sorts of circumstances, ranging from reenactment events in North America to small-town markets in Italy.
A quick & easy project, great for small gifts and SCA* largesse!
…and yes, the image has been turned 90° – the bag was photographed hanging in front of a door
Ideally, before the move, I would have gone through my stuff and done a thorough declutter. But for almost a year before we put the house on the market, we spent what spare time we had replacing a kitchen and three rooms’ worth of floors, having part of the house re-roofed, a lot of patching, painting, cleaning, garden work, and finally, staging. And it was worth it, even with the cost of the updates. The house sold for 26% over asking.
However, it meant that, instead of a thoughtful keep/donate/sell/toss process, we crammed everything into boxes and moved the lot, planning to do the sort & cull when unpacking.
Best laid plans…
First, closing on our new place was delayed by a month, to the end of October, and a bunch of work on the house was delayed. Our “new” house was built in 1926, and had been a neglected rental for years, so we knew that there were major repairs needed and had planned for them. Of course, they took a lot longer than expected, there were surprises, and, also of course, cost more. Luckily, our garage is huge, separated into a one-car space and a two-car space, so a lot of stuff got stacked in the bigger garage.
By the time the essential work, which included digging up the length of the driveway to replace the sewer line, was done, it was too cold to work in the garage. In the Canadian winter even a couple of space heaters wouldn’t have managed to heat the cavernous double garage. And would probably have tripped the breaker.
The following summer, between more work on the house, recovering from foot surgery, and our annual two-week camping trip, I only got a little unpacking done. So this summer, I’ve finally tackled the rest. The stuff’s been packed up so long that I’m calling it garage archeology, and it’s hard. Really, really, really hard. Dust, dirt – and decision fatigue.
As an artist, I see possibility in so many things! At the moment, the biggest decision I have to make is what possibilities to pursue, and which to pass on. At 81, I don’t have a huge amount of time, so I want to focus. One of the saddest episodes of my life was helping a friend sort out her late husband’s effects. He was a talented musician, but his demons eventually overwhelmed him, and, by the time he died, his collection of “possibilities” was hoarder-level. I do NOT want to follow that path, or burden my kids with a mess to make sense of. So another decision. A complicated one, and not easy.
And emotionally demanding.
But back to the garage archeology Four of us – me, my daughter and my two granddaughters, did the packing. And even though we kept a fairly thorough packing list, it was impossible to list Every. Single. Thing. Because the packing was more by room than by subject, things got mixed. In the first burst of unpacking, when I went by boxes marked “kitchen”, “bedroom”, “bathroom”, etc., I quickly realized that, until I’m pretty sure I’ve found everything for one area, organizing beyond the essentials is frustrating, and has to be redone when more turns up that belongs with the “organized” stuff. So now I’m going box by box, eliminating the obvious, and sorting the rest into temporary collections by subject.
It makes for a two-step sort, which actually helps. When I see all the stuff that belongs to one area, it’s significantly easier to pick out what I want to keep, and what can go! Progress happens, but it’s still not easy.
But, most difficult is that, since the move, I’ve done very little creative work – knit a scarf, made a kirtle, did some sketches, drafted a pattern, and finished a project that had been on hold for years. That would have been maybe a couple of months’ work, and it’s left me feeling bereft. But I know that if I invest the time to conquer this stuff overwhelm– and the “ooo, shiny!” habit that underlies a lot of it, I’ll be better off – and more free to make art.
And it’s brought home to me that stuff you own owns you right back. From a house to a stitch marker, it’s a responsibility, and demands a chunk of your life.
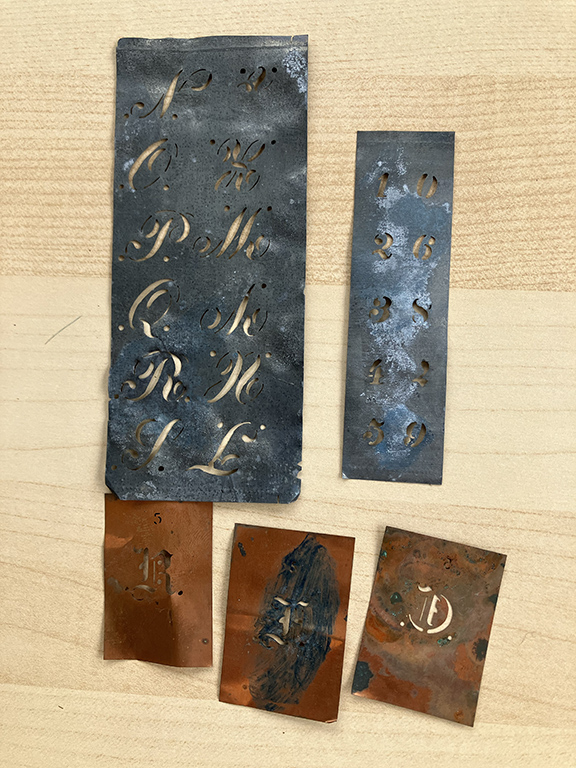
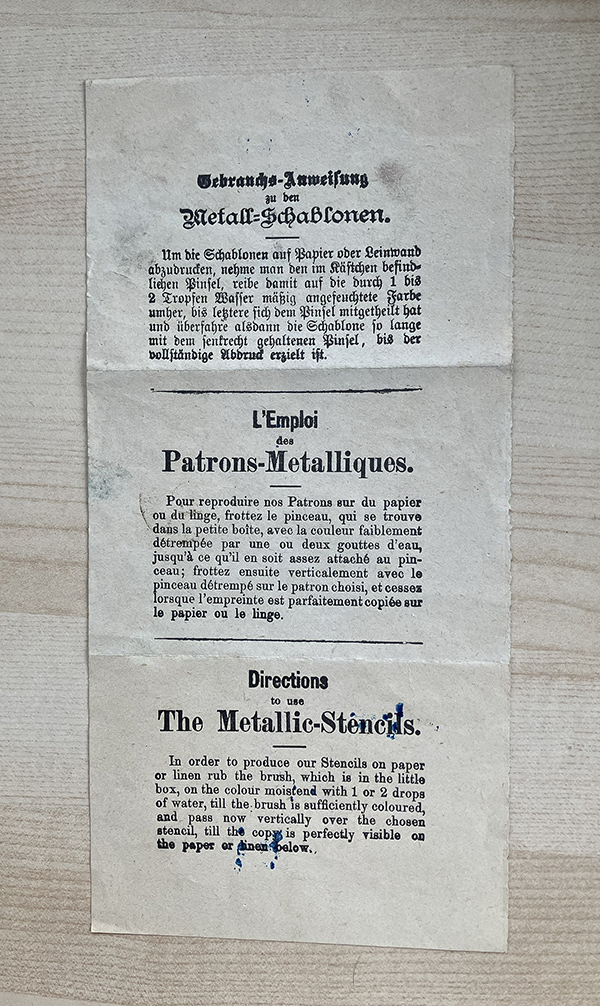
Years ago my sister-in-law gave me a laundry marking kit. It dates from before 1930, and was from her Dutch family stuff. It’s an attractive object, and, because it’s a gift from her, I’ve kept it through many moves.
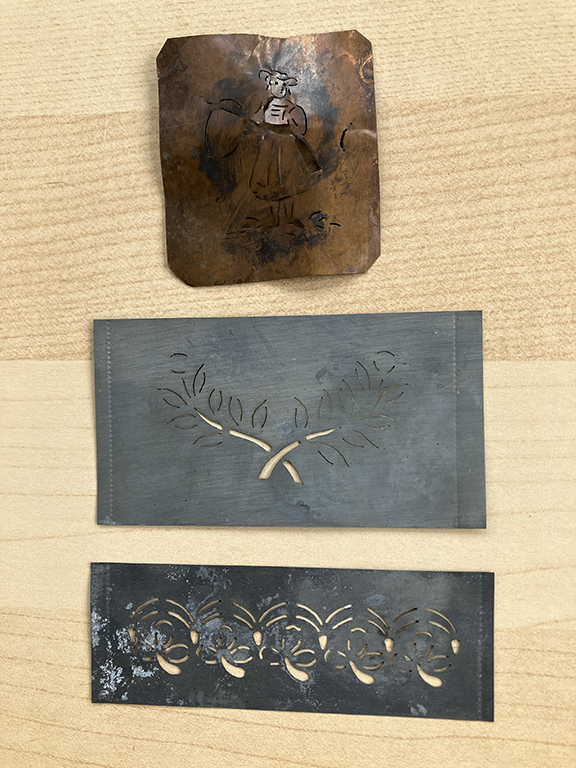
In the box, there’s a bunch of thin metal sheet stencils, mostly copper. One sheet has part of an alphabet, another has the numbers 0 to 9, there’s repeating motif that looks like it’s for borders, three large fancy letters, a picture of a child with a hoop and stick, and, to my delight, a laurel border motif. The laurel stencil has never been used, and, oddly, is a grey metal. I’m guessing that it wasn’t part of the original kit.
To mark the fabric, there’s a brush, and a tiny china dish with a tablet of blue pigment. I’m guessing it’s the same chemical as laundry bluing – ferric ferrocyanide aka “Prussian blue”.
And the instructions. In three languages, which is oddly nostalgic. We’re so used to multi-lingual instructions; somehow, despite the olde timey font, it makes the kit seem more present.
As for what was originally in the kit, again, I’m guessing. Almost certainly, it had all the letters of the alphabet, though I suspect the fancy individual letters may have been bought separately. I have no idea how many border or image stencils it included. Maybe some came with it, and maybe, like the fancy letters, they might have been bought separately.
The kit has obviously been used; the brush is stained blue, some of the stencils have blue brush marks, and the surface of the pigment tablet has been wetted and rubbed – presumably with the brush.
There are also several things that don’t appear to belong – another tablet of pigment that’s too big for the dish, a pair of tweezers, a tiny ivory-handled crochet hook, and an ivory object that looks like it’s for cleaning under fingernails. I suspect that, at some point, someone tucked them into the box just because they fit.
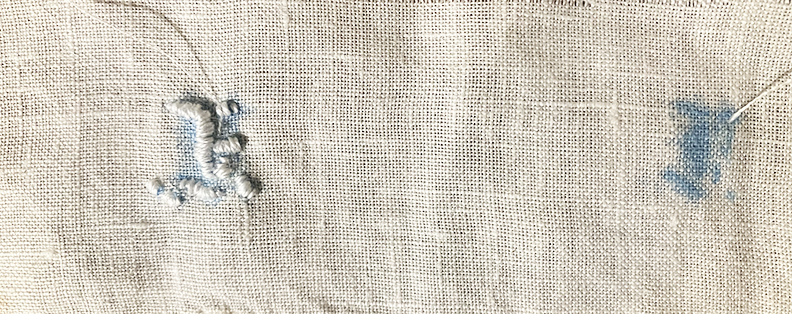
But I’ve never actually explored using it until a convo with The Sempster nudged me into seeing how it works – or if it still works.
It does. I fished out a scrap of handkerchief linen, wetted the pigment, rubbed the brush over it, and marked the linen using one of the fancy letter stencils. I wet the pigment too much, so it came out wet & blurry, but, with a good light and a bit of squinting, one of the two marks was clear enough to embroider over. So I dug out a skein of cotton embroidery floss and did a bit of quick&dirty embroidery.
Then I washed out the blue. The marking material doesn’t wash out with just water, hot or cold. Since I don’t know how old it actually is, and might predate detergents, I used laundry soap. Though it took some persistence, and much hot water, it did eventually wash out
This was a sentimental practice run with a small, mundane object. Somewhere in the process, I realized that all of the napkins and handkerchiefs that I have that date back to the 1930s or earlier have embroidered monograms. I had assumed that that was just how it was done – a status marker, a way of saying “MINE!”.
That’s probably a large part of the reason, but, essentially, they’re marked so that the laundry gets the right piece back to the right person…
I got this fascinating book last fall, just before we moved. It shows how to make an amazing array of textures and patterns with a weird mix of super-simple knit patterns and math. Or, in knitters’ terms, it uses short sequences of knit and purl stitches, repeated over and over and over and over – on at least one more stitch than multiples of the length of the sequence.
Which brings in the change ringing – recently I had a chance to participate in a demonstration of change ringing with hand bells at a Society for Creative Anachronism event. Change ringing is also pattern-making with short sequences. Instead of stitches, it uses tones, and repeats by starting each round at a different place in the sequence.
The other element is the Elizabethan whitework sampler, like this one in the Metropolitan Museum of Art – long&narrow, many patterns, one colour. Again, making a series of patterns with repeats of short sequences – this time stitches again, though thread through fabric rather than loops of yarn.
Weirdly, when I googled on “mathematics repeat “short sequences”” looking to see if there’s a name in mathematics for this kind of pattern making, it brought up pages&pages of information on short sequence repeats (SSRs) in DNA replication! Which is intriguing, and a little startling.
But, for now, I’m going to stay out of the DNA rabbit hole, and stick to repeating short sequences in a lovely pale grey merino/silk/yak yarn.
By Helena Frei|
2024-04-06T16:30:57-04:00 April 5th, 2024|books, embroidery, knitting, math, Renaissance|Comments Off on Sequences, a project with three parents – a new book, change ringing, and Elizabethan samplers
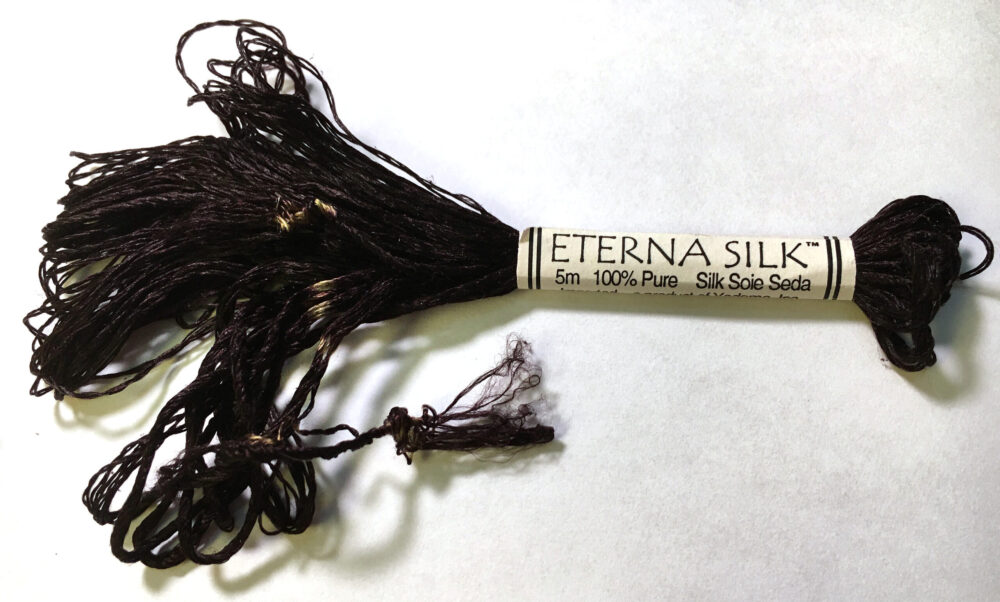
Last year, when I was working on my blackworked half smock, I had a horrible shock when I washed the embroidered panels before assembling the smock – the black thread leaked a dark & murky purple.
Luckily, the purple mostly rinsed out, and the half smock looks OK.
Today, I was sorting through my studio stuff, and ran across a bag of the black silk threads I’d used, and decided to see if I could identify which one leaked dye. There were two kinds – Eterna, and a Chinese hand-dyed silk that I’d bought from Miriam’s at Pennsic (a Society for Creative Anachronism event).
I soaked each one in a small amount of water.
The culprit was the Eterna silk. Within a few minutes, the ten-centimeter length I used ran purple. I was truly horrified – and surprised. Eterna is lovely to work with and has an excellent reputation. Possibly an “off” lot – the ends were tied oddly, and left undyed spots in several places, which isn’t something I’d expect from Eterna. Sadly, it’s no longer in production, so I can’t buy another skein & see if it leaks too.
I’d kinda expected it to be the Chinese hand-dyed silk from Miriam’s! It did leak a faint yellow – when I left a whole skein to soak overnight.
From now on, when I’m setting up to embroider something that will need washing, I’ll test the threads for leaking. And, just to be sure, will treat them with Raycafix, which somehow stabilizes the dye and keeps it from leaking.
I love this rose! December 7, a bit stunned that it was still blooming, I cut a twig with a flower and a bud.
I put it in a vase, and changed the water from time to time, as one does. The flower bloomed, faded, and dropped its petals. The bud went through the same cycle. The leaves stayed green, or mostly green, so I kept changing the water occasionally.
Until the day I noticed that the bottom of the twig had developed tiny whitish bumps around the edge. They looked like the beginning of roots – wildly unlikely in a cutting taken on the seventh of December, and kept in a vase on the kitchen table. But I took a chance, and planted it in a slurry of water & potting soil, and gradually added more soil.
Three days ago I realized it was putting out new leaves! Yay Morden Sunrise! You’re an amazing rose!
In sixteenth century Europe, blackwork was the most fashionable and go-to style of embroidery for linens. The relatively simple materials required – linen, a contrasting fine fiber, and the ability to count threads – saw a veritable blooming of this intricate style of embroidery. Surviving examples include smocks, sleeves, coifs, forehead cloths, the occasional cushion, at least one skirt1, and many, many portraits.
Remaining examples of early medieval designs are highly geometric. There’s a strong resemblance between blackwork and a monochrome Middle Eastern embroidery technique which may have migrated to Europe from Egypt via Moorish Spain.
The example below is 13th-15th century, from Egypt2.
It was once thought that blackwork came to England with Catherine of Aragon, who arrived there in 1501. However, it was in use much earlier. One of the earliest literary appearances of blackwork can be found in Chaucer’s Canterbury Tales, written between 1387 and 1400. His description of the miller’s wife’s smock sounds like the classic double running stitch used in blackwork, where the pattern is the same on both sides3 :
Of white, too, was the dainty smock she wore, embroidered at the collar all about with coalblack silk, alike within and out.
Blackwork evolved rapidly to include a wide range of patterns; from intricate geometric repeats to an almost freeform style, lively with critters and fanciful flora.
Like the collar of the miller’s wife’s smock, the geometric motifs are sometimes reversible. A double running stitch and thread counting can permit the pattern to be the same on both sides. This method of blackwork embroidery is also known as Holbein stitch4 because of its frequent appearance in his portraits. It’s one of the few kinds of embroidery that follows the (totally unrealistic) Victorian conceit that embroidery should be as tidy on the back as on the front!
The cuff on the left in the image below5 is from the 1530 Holbein portrait of Jane Seymour. The embroidery painstakingly painted illustrates counted stitch blackwork being used to produce an intricate and delicate geometric pattern.
On the right is the slightly later portrait of Queen Elizabeth’s sleeve (from an unknown artist in 1590). Compared to the cuff, the sleeve demonstrates the evolution of blackwork from the early geometric style to the later freeform style.
The design
The collar, plackets, and cuffs of my linen waist smock are embroidered in the later, freeform style. The design was inspired by the front panels of the smock worn by Europa Anguissola in her sister Sofonisba’s painting The Chess Game6:
The motifs are an adaptation of those on this coif in the collection of the Museum of Fine Arts, Boston7:
I adapted the design, adjusted the scale, redrew it, and added pea pods & snails for whimsy.
The finishing trim and ties are an adaptation in black of the crisp whipstitched cord edging and ties on the collar of this shirt from the collection of the Victoria & Albert Museum, which I also used as a model for the cut. I have used the rectangular cut8 of a shirt because, as the half smock only goes to the waist, it doesn’t need the hip width provided by the triangular gores that are used in women’s full-length smocks. The shirt is also shown in the well-loved Janet Arnold tome: Patterns of Fashion 4.9
For my half smock, the ground fabric is white handkerchief linen, and the thread is loosely-twisted black filament silk. The embroidery is mostly executed in stem stitch, with a sprinkling of others – such as spiderweb, stippling, blanket stitch, and herringbone – where the motif suggests it.
Assembly
For the main seams, the individual pieces are hemmed and assembled with a faggoting stitch. The other seams are clean-finished using whip stitch, slip stitch, or flat felled, where appropriate.
The strings at the neck and cuffs are fingerloop braided from buttonhole-weight spun silk. To keep the front panels in line, I made a hook and sewed it in below the placket. It’s made of 18 gauge brass wire, formed with pliers, and work hardened in a tumbler. It fastens with a thread loop, which is less likely to unhook than a matching metal one would be.
Comments Regarding Blackwork and The Internet
Today, April 13th, 2022, searching for “blackwork embroidery” on the web brought up 2,780,000 hits. I included “embroidery” in the search terms because just “blackwork” brings up a lot of tattoo pages, which are sometimes interesting, but usually irrelevant. Many of the “embroidery” pages are also irrelevant to research: touting clothing, commercial embroidery services, supply sales, kits etc. However, if you have the patience to wade through the distractions, there is a lot of good, solid information and research out there. A very deep rabbit hole – easy to lose an afternoon in.
Museum of Fine Arts, Boston, Accession Number 1996.51 [↩]
Victoria and Albert Museum, Accession Number T.112-1972 [↩]
Arnold, Janet et. al., Patterns of Fashion 4 c. 1540-1660, The cut and construction of linen shirts, smocks, neckwear, headwear and accessories for men and women, Macmillan, London, ISBN 878-0-333-57082-1, 2008, p. 17 [↩]
A caution to authors: no matter how well you know your subject, no matter how deeply you’ve researched it, also research your tangential comments. Getting a detail wrong can torpedo your credibility.
A case in point: I’ve just taken The Empire of Cotton out of the library. Been waiting for it for a while & was eager to start listening. Within the first ten minutes – literally – the author made six blanket statements about pre-industrial textiles in Europe that I know are flat out wrong.
The biggest clunker is:
“[your clothes] are largely monochromatic since, unlike cottons, wool and other natural fibres do not take colours very well”
really? Had the author done ANY research on pre-industrial dyes? Any at all? Or even looked at paintings of the period? While linen takes colour indifferently, wool accepts dyes just fine, and silk dyes magnificently!
Other dubious “facts”:
“you wake up in the morning in a bed covered in fur or straw”
while fur is nice & warm, and straw certainly was used – even in the 20th century, I had occasion to sleep on a paillasse – your pre-industrial bedding might include, among other things, wool, feathers, down, linen, hemp, and, if you’re super-rich, possibly even silk. Not just fur&straw
“it is hard to wash your clothes”
linens, and some wools, are easy to wash
“you change [your clothes] irregularly”
most people in Europe wore linen next to the skin and changed these body linens routinely, even daily if they could afford it.
“[your clothes] smell”
while standards were less exacting than today’s, stinky clothes were not the norm. Cleanliness was important – one of the functions of body linens was to protect the outer clothes.
“…and scratch”
not all wools scratch, most linens don’t scratch, and I’ve never met a scratchy silk
He did get one thing right:
“[your clothes] are expensive or, if you make your own, labour intensive”. Actually, if someone makes them for you, they’re still labour intensive.
The author appears to have been trying to set up his book’s background with a quick gallop through the conditions preceding his main subject. Which is fine; he wasn’t writing about the pre-industrial rag trade. But making pronouncements based on assumptions that seem to come from a combination of “everybody knows” & entertainment industry interpretations, was a mistake.
Now that I know he didn’t know what he was talking about in an area I know well, I wonder what else he got wrong. I’m going to return the book without finishing it. He may be 100% accurate about everything else, but how would I know?